Friday, November 23, 2007

2. InDesign Portfolio Investigation

Create a Four Page Portfolio in Adobe InDesign

Now that you have learned the basics of InDesign, this formative project will help you to understand how well you can do the task.

TASK
Create a four (4) page portfolio of your best work to date.

REQUIREMENTS

- Four Pages
- Table of Contents
- Title Page
- Three pages of content
- Navigation elements

- Your artwork must be titled and 'described'.

ASSESSMENT


Digital Portfolio Rubric


Excellent


Above Average


Good


Fair


Needs


Improvement


Portfolio Appearance


Readable - Is there enough contrast between the background color and the text color to make the portfolio easy to read?


Professionalism - Is the appearance of
the portfolio professional? Are the graphics, colors and portfolio
language consistent with professional workplace expectations?


Organization - Is the portfolio organized in a manner that makes it easy to follow and easy to quickly locate vital information?


Portfolio Content and Function


Links - Do all the portfolio links function properly?


Content - Are there functional links to all essential portfolio content areas?


Resume, Activities List, Letters of Reference, Skills and Abilities,
Academic References (Transcript, Report Cards), Awards, Work Samples.


Authenticity - Are the samples and illustrations a true reflection of the student’s efforts and abilities?


Portfolio Presentation


Speaking - Did the students speak clearly at a pace and volume so the audience could clearly understand what was being communicated?


Eye Contact and Body Language- Did the student make appropriate eye contact with the audience and maintain appropriate body posture?


Questions - Did the student appropriately and confidently address audience questions?


Overall Portfolio Impact


Is this Portfolio an asset in demonstrating the student’s value
(skills, abilities, knowledge) to a potential employer or college
representative?


Evaluator Signature


Student Signature


Date

Wednesday, November 14, 2007

1. Getting Into InDesign!

Adobe InDesign is 'Page Layout' software.
You have incredible control over your pictures and text!

Today you will learn to:
- create a new InDesign document
- place images
- manipulate images (shrink, stretch, frame, and fit)

These are the tools you will learn:
- Selection Tool
- Direct Selection Tool
- Right Click - Fitting
- File -> Package
---and others you discover along the way!

NOTE: INSERTING IMAGES
Your pictures must be stored on a drive.
You must use the PLACE command to add pictures to your document.

NOTE: When done your document, you must then PACKAGE your file. This consolidates (brings together) all your images to one location on your drive. (This is almost the same as Saving a Movie File as compared to the Moviemaker project.)

TASK
Make a one page collage covered with images that you have intentionally placed!

DO THIS:
1. Open InDesign.
2. Make a new document. (File --> New --> Document
3. Decide on a theme. (people, faces, cars, peace, justice, information technology, fashion, etc.)
4. Collect your images from wherever.
5. Use the Place command to add each picture. Format as required.
6. When you are finished, Package the document. (File --> Package)

Monday, November 5, 2007

6. PAGE - Reflections

TIME TO REFLECT

WOW!

How impressive are we?

It is time to reflect on your successes and areas you'd like to strengthen.

DO THIS!
1. Create a new post and respond to the following prompts. (Copy and paste these if you'd like.)
a) I am thrilled with my work because...
b) I never thought I...
c) The things that were most difficult...
d) Here is a list of all the steps, in sequence, of how I accomplished this project:

Tuesday, October 23, 2007

5. PAGE - Creating your Placemark & Info

LET'S DO IT!!

These instructions assume that you have:
- uploaded your image(s) to Google's Picasa
- uploaded your movie to Google Video
- written your text
- have your links ready

DO THIS!

1. Copy these two files from the ASM3O Outbox to your UNIT TWO directory.
- PAGE - KML Code (Word document)
- Untitled Placemark (kmz file)

2. Double click the Untitled Placemark .kmz file.
Google Earth should open.

3. Replace the APPROPRIATE code with your own information.

4. Copy the EMBEDDED HTML where appropriate.

5. Use Trial-and-Error to see how it's going.

Tuesday, October 16, 2007

4. PAGE - Researching and Gathering

Your 'driving question' guides your research.
Write it down. Memorize it. Quiz each other on it. Know it.
The 'driving question' is what you are finding answers for as you research.

DO THIS!

1. Research and Gather
- Search.
- Collect pictures (remember the sources).
- Write notes.
- Organize these in your Unit Two 'directory'.

2. Create a Reflection post called "PAGE - Research & Gather Reflection"
- Write a summary of your accomplishments, ahas, troubles, thoughts and other musings!

Monday, October 15, 2007

3. PAGE - Coming to your DRIVING QUESTION

PAGE = Peace through Art with Google Earth

BLOOM'S REVISED TAXONOMY
Peter will explain Bloom's Revised Taxonomy to you. It is basically a way to think about learning. Teachers normally talk about it - but, it is valuable to you as a way to understand learning.


DRIVING QUESTION
You must develop a 'driving question' to guide your research and creation.

What is a 'driving question'?
It is a question - a 'fat' question - a 'big' question. It is 'higher order' rather than 'lower order'.

Lower level questions are those at the remembering, understanding and lower level application levels of the taxonomy.
Examples:
How many...?
What is...?
Who was it that...?
Can I name ...?

Higher level questions
are those requiring complex application, analysis, evaluation or creation skills.
Examples:
How is...similar to...?
Can I distinguish between...?
Why is ....of value?
Can I create new and unusual uses for...?

DO THIS! :)
1. Create a New Post called "PAGE - My Driving Question"

2. Write all your thoughts in here as you struggle with coming to your 'driving question'.

3. Finish the Post by writing your 'driving question'. Copy this:
My 'driving question' is...


Wednesday, October 10, 2007

2. GOOGLE EARTH (GE) - Navigation, Placemarks, Ruler

NAVIGATION CONTROLS

1. Learn different ways to navigate effectively in Google Earth. Complete this tutorial.

PLACEMARKS & RULER

1. Add placemarks for your home and the school.

2. Use the ruler to create a line and determine how many kilometres it is from your home to school.

3. Email the image to me at pskillen@ymcaacademy.org

NOTE:
- Include in the email the distance in kilometres.


Tuesday, October 9, 2007

1. GOOGLE EARTH - International Peace through Media

The YMCA embarks on Peace Week beginning on November 17th - The Power of Peace - the Power of People.

Today, we are embarking on a new media adventure using Google Earth! This media adventure will celebrate peace art and artists from around the world - including your own art from the Digital Artists' Canvas project.


GOOGLE EARTH INTRODUCTION
Today, we will begin to explore and learn how to use Google Earth. We shall start out simply but will learn to create our own 'tours' with placeholders, pictures, text, and video. We will learn to make and share our own .kml and .kmz files.

1. Overview - Peter will demonstrate some samples of media-rich Google Earth tours.

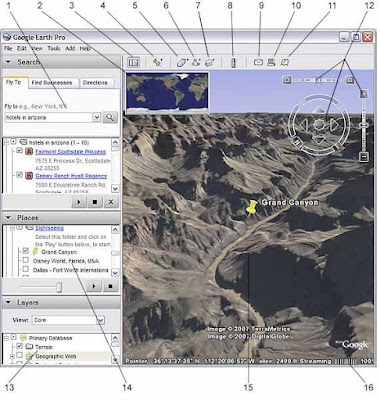
2. Learn the Basics -
1. Search panel - Use this to find places and directions and manage search results. Google Earth EC may display additonal tabs here.
2. Overview map - Use this for an additional perspective of the Earth.
3. Hide/Show sidebar - Click this to conceal or the display the side bar (Search, Places and Layers panels).
4. Placemark - Click this to add a placemark for a location.
5. Polygon - Click this to add a polygon.
6. Path - Click this to add a path (line or lines).
7. Image Overlay - Click this to add an image overlay on the Earth.
8. Measure - Click this to measure a distance or area size.
9. Email - Click this to email a view or image.
10. Print - Click this to print the current view of the Earth.
11. Show in Google Maps - Click this to show the current view in Google Maps in your web browser
12. Navigation controls - Use these to tilt, zoom and move around your viewpoint (see below).
13. Layers panel - Use this to display points of interest.
14. Places panel - Use this to locate, save, organize and revisit placemarks.
15. 3D Viewer - View the globe and its terrain in this window.
16. Status bar - View coordinate, elevation and imagery streaming status here.

(Picture and notes courtesy of Google Earth User Guide)

DO THIS
1. View an image of your home, school or any place on Earth.
Click Fly To...
Enter the location in the input box and click the Search button.
Google Earth flies you to this location.

2. Go on a tour of the world. In the Places panel, check the Sightseeing folder and click the Play Tour button.

3. Explore - Explore intentionally. (What does this mean?)

16. Digital Artist's Canvas - Finishing Up!

AWESOME!!

We need high resolution .jpg images to print.

DO THIS

1. Open your final .psd file in Photoshop.
2. Save As - and save a high resolution .jpg to your directory.
3. Make a new directory called UNIT 5 (Portfolio).
4. Put a copy of that .jpg in the UNIT 5 (Portfolio) directory.

Be sure that the filenames are correct!

Tuesday, October 2, 2007

15. Digital Artist's Canvas - PRESENTATION

CELEBRATION TIME!!

Present your work to the class!

Use your Reflection notes to help you to prepare your presentation. ENJOY IT! :)

Include the following:
- show your source images
- explain the steps you took
- describe any techniques you used
- explain the difficulties you encountered and how you overcame them
- explain what you would do differently next time


14. Digital Artist's Canvas - TITLE, COMMENT, REVIEW

TITLE

Edit your last post and give your artwork a title.

COMMENT

Comment substantively on the the work of three other students.

Here's How
Copy and paste the following into a Comment for each of three students.

I like your art because...

Your art makes me feel...


I don't understand...


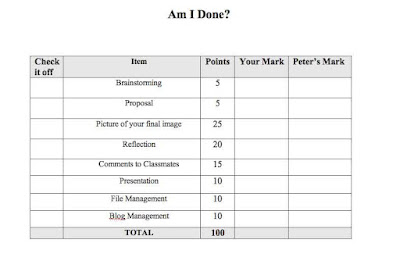
REVIEW

Read this chart and make sure you have done everything satisfactorily.


Monday, October 1, 2007

13. Digital Artist's Canvas - Post & Reflect

POST

1. Create a new Post called "YourName's Final DAC"

2. Upload your final .jpg.

REFLECTION


3. Copy and paste the following questions into your own blog. Answer them.

a) What changes did you make to the original images you used?

b) What pleases you most about the technical quality of your work? Why?

c) What displeases you most about the technical quality of your work? Why?

d) What new techniques or skills did you learn through the completion of this activity?

e) What message did you hope to convey in your collage, if any?

f) What emotional response do you hope to elicit from your audience?

g) What changes would you make to improve on this image?

Tuesday, September 25, 2007

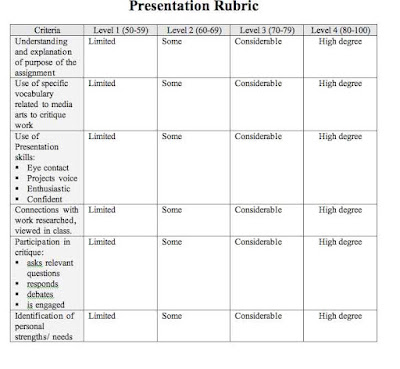
12. Digital Artist's Canvas - RUBRIC

Read this. Understand it. :)

This is the rubric that we agreed to use. (Click on it to make it bigger.)

If you have questions, please comment to this post.


Monday, September 24, 2007

11. Digital Artist's Canvas - PRODUCTION

CREATE YOUR ART following these instructions:

1) GET ORGANIZED
❏ Create a New Folder and name it “YourName’s Canvas”
❏ Select images (web, magazines, newspapers, etc.).

❏ Put selected images into your computer and save each image as a separate file.


2) START A NEW PHOTOSHOP FILE
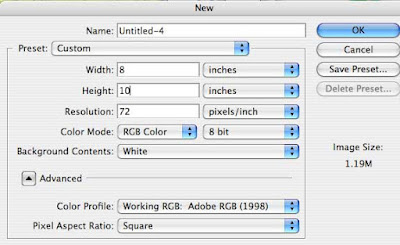
❏ Start a new PhotoShop file.
❏ Select 8 X 10 as the size.
❏ Add your base picture.
❏ Save As “Yourname’s Canvas 1.psd”


3) ADD PICTURE ELEMENTS
❏ Using the program tools, ‘cut out’ the desired picture elements from each image file, and add them to your destination file
OR
❏ Drag and drop them into your base picture file.
❏ Add text as desired. Customize this text to suit the theme.


4) MODIFY IMAGES
❏ Establish proportion as required
❏ Adjust contrast, brightness, etc. as required
❏ Remove any ‘blemishes’ on images through the use of filters in the digital imaging program chosen.
❏ Use filters to help create atmosphere.


5) SAVE AS .JPG
❏ Save your final product as a .jpg file called “Yourname’s Canvas 1.jpg”


Thursday, September 20, 2007

10. UNIT ONE - Culminating Activity

DIGITAL ARTIST'S CANVAS

INTRODUCTION
Note: This activity counts! This is a summative evaluation for Unit One.

These Overall Expectations will be evaluated.
  • Use appropriate vocabulary to discuss media art in a variety of contexts (THV.01)
  • Describe how various concepts (elements and principles) and techniques and procedures are used in their media artworks and the work of others (THV.02)
  • Use media arts concepts in their own work (CRV.01)
  • Use both traditional and emerging technologies and procedures to create media artworks (CRV.02)
  • Apply the stages of the creative process (researching, exploring, experimenting, executing, evaluation to create artworks individually and in groups (CRV.03)
  • Use concepts and procedures that media arts shares with other arts when creating works of media art (CRV.04)
  • Evaluate the aesthetic components of their own and others’ works of media art or productions, demonstrating an understanding of the process of critical analysis (ANV.01)
  • Analyse the impact of media artworks and productions on themselves and their communities (ANV.02)
  • Analyse the function of media art in society (ANV.03)
TASK
Create a media artwork that constitutes a new “reality”.

You will conceive, create and reflect on a new “constructed” reality by using the principles and techniques of collage and montage.

THEME
How can respect bring peace?

STEPS

A. PRE-PRODUCTION

(i.e., brainstorming, research, completion and submission of proposal);

Read this:
In order for you to do this project you must be an artist. You are to express yourself through your artwork. In order to express yourself, you need to have something to express! Therefore, you need to research the topic - How can respect bring peace?

As you research, keep track of thoughts and ideas that might work for your project.

Do this:
1. Research, learn and struggle with the ideas.
2. Create a new Blog Post called Digital Artist's Canvas Proposal.
3. Read, copy and paste this sentence into your blog.
"I am aware that I will be evaluated on the final product and on my successful presentation of my concept or theme. I am aware that Peter must approve this project idea before I continue."

4. Complete, or answer, the following in the proposal:
Here is what I learned during my research:

Here are three ideas/topics that I have thought of:

The idea I have chosen to pursue is:

Wednesday, September 19, 2007

9. Preparing for the Digital Artist's Canvas

GETTING ORGANIZED

1. Blog Ready?
Be sure that your blog is up to date and as perfect as you'd like it to be. Do all the Student Links work?

2. How can RESPECT bring PEACE?
Start thinking about what this means to you. An artist thinks deeply about the question and dreams up images to express feelings and ideas.

3. Start Gathering Images
- newspapers, magazines
- websites
- original photographs

4. Practise Your Skills
Take more time, if you need, to practise your skills as you let the ideas about the project bubble inside.

Monday, September 17, 2007

8. Collages with Layer Masks in Photoshop

Create your collages using Layer Masks.

It is much more efficient!

Check out this video tutorial called Creating Multi-Photo Collages with Layers.

TASK:

  1. Create your own collage using Layer Masks.
  2. Use at least three source images.
  3. Save it as a .psd as "Yourname Mask.psd"
  4. Save it as a .jpg as "Yourname Mask.jpg"
  5. Create a new Post in your blog called - Collages with Layer Masks.
  6. Upload your "Yourname Mask.jpg" file.
  7. Write about what you learned. What was new? What was difficult? What was easy? How might you be able to use this skill?

Friday, September 14, 2007

7. Performance Task - What is Real?


TASK:
You will create a new picture out of three files. Your goal is to make it look exactly like the one in this Post.

INSTRUCTIONS:
1. Navigate to the ASM3O folder in the Classes drive on My Computer.

2. In the Outbox you will see a folder called What is Real - Performance Task.

3. Use the three files to create this picture.
- Pay attention to all the details so that you can replicate it.

4. When you are finished, save it to your directory as a .jpg.

5. Create a new Post in your Blog called What is Real - Performance Task.

6. Upload your picture to the Post.

ASSESSMENT:
You will be assessed on the following skills:
- making clean selections
- resizing
- moving layers back and forward
- file management (do you AIM IT and NAME IT?)
- following the instructions

NOTE:
If you wish to improve upon the picture I provided, do so - but make a note of the changes in your Comment.

Thursday, September 13, 2007

6. Post & Reflect On your UnReal Animal

It's time to post your creation!

By the time you are done this activity, you will have your UnReal Animal and Reflection in TWO places:
1. on your own blog with the title "YourName UnReal Animal"
2. in your My Documents --> ASM3O --> Unit One --> UnReal Animal with the SAME filename - "YourName UnReal Animal"

STEPS
1. Finish your picture in PhotoShop (.psd)
2. Save it as a .jpg with the correct filename to the right directory. (NAME IT and AIM IT)
3. Log in to your Blogger account.
4. Create a New Post.
5. Title it "YourName UnReal Animal"
6. Upload your picture.
7. Write a reflective response. Include many of these words or ideas:
- difficult
- easy
- clone
- lasso
- I like my picture because...
- I wish I could...

Monday, September 10, 2007

5. Genetic Engineering Gone Awry (Intro)

TODAY'S PLAN

A. Examine the blog to ensure we understand all the blog's elements and features. (We will use the SmartBoard to make it explicit.)

B. Genetic Engineering Gone Awry

TASK:
Create a new picture using Photoshop of an animal that doesn't exist.

LESSON:
Keep notes as I demonstrate the STEPS.

STEPS:
1. Create a folder called Genetic Engineering Gone Awry.
2. Create a folder inside that called Source Images.
3. Choose and download some number of source images.
4. Create a New Photoshop file - dimensions 8 X 10 (horizontally or vertically).
5. Open one of your source files and select the picture element. Copy and paste it into your New PhotoShop file.
6. Save your file now. Call it "YourName UnReal Animal".
7. Do Step 5 with the other source files.

HINTS:
Save your work frequently.
Revisit the Cool Merged Pictures as necessary - just to see them for ideas.

Friday, September 7, 2007

4. What is Real? (Implications)

Today you will see some other samples of special effects from video clips on YouTube. (I typed in the words 'special effects' as a search query.)

We will discuss the societal implications of altering what we see.

TASK
Describe the number of unreal images you see each day. Give examples.
What might be the effects of constantly being presented with tampered images and sounds?

Write your response as a comment to this post.

Thursday, September 6, 2007

3. What is Real? (Still Images)

Here is a gallery of UnReal Images. I will demonstrate and discuss these with you.

Here is a gallery of Cool Merged Images.

Notice that the
better images have:
-
seamless edges
-
consistent proportion (all the picture elements have been resized to make sense sizewise)
- matching
colour and lighting

Here are some links to other art. I will demonstrate and discuss these with you.
M.C. Escher
Worth1000

TASK:

1. Take some time to explore these websites. Keep in mind HOW an artist makes the images

2. Describe what you learned today (tips, techniques, concepts, principles).
Write a Comment to this Post.

Wednesday, September 5, 2007

2. What is Real? (View and Respond)

View the following clip as many times as you like.

Write a
Comment to this Post using the following prompts:
- Describe the visual effects in your own words.
- Describe anything you don't understand.
- Describe how this might inspire you to create your own special effects.

HINT: You may want to write the
comment in Word and then copy and paste it into a Comment to this Post.

1. What is Real?

Here is a video for us to discuss as a class. The video that you will see is not real. As you watch it, consider HOW the film maker made it look real.