Tuesday, September 25, 2007

12. Digital Artist's Canvas - RUBRIC

Read this. Understand it. :)

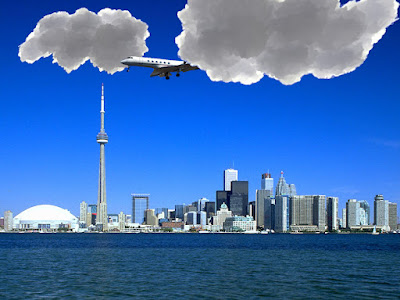
This is the rubric that we agreed to use. (Click on it to make it bigger.)

If you have questions, please comment to this post.


Monday, September 24, 2007

11. Digital Artist's Canvas - PRODUCTION

CREATE YOUR ART following these instructions:

1) GET ORGANIZED
❏ Create a New Folder and name it “YourName’s Canvas”
❏ Select images (web, magazines, newspapers, etc.).

❏ Put selected images into your computer and save each image as a separate file.


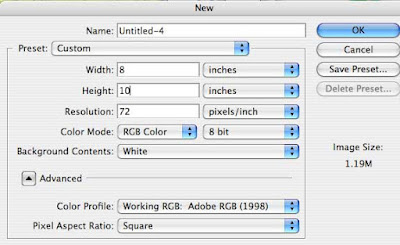
2) START A NEW PHOTOSHOP FILE
❏ Start a new PhotoShop file.
❏ Select 8 X 10 as the size.
❏ Add your base picture.
❏ Save As “Yourname’s Canvas 1.psd”


3) ADD PICTURE ELEMENTS
❏ Using the program tools, ‘cut out’ the desired picture elements from each image file, and add them to your destination file
OR
❏ Drag and drop them into your base picture file.
❏ Add text as desired. Customize this text to suit the theme.


4) MODIFY IMAGES
❏ Establish proportion as required
❏ Adjust contrast, brightness, etc. as required
❏ Remove any ‘blemishes’ on images through the use of filters in the digital imaging program chosen.
❏ Use filters to help create atmosphere.


5) SAVE AS .JPG
❏ Save your final product as a .jpg file called “Yourname’s Canvas 1.jpg”


Thursday, September 20, 2007

10. UNIT ONE - Culminating Activity

DIGITAL ARTIST'S CANVAS

INTRODUCTION
Note: This activity counts! This is a summative evaluation for Unit One.

These Overall Expectations will be evaluated.
  • Use appropriate vocabulary to discuss media art in a variety of contexts (THV.01)
  • Describe how various concepts (elements and principles) and techniques and procedures are used in their media artworks and the work of others (THV.02)
  • Use media arts concepts in their own work (CRV.01)
  • Use both traditional and emerging technologies and procedures to create media artworks (CRV.02)
  • Apply the stages of the creative process (researching, exploring, experimenting, executing, evaluation to create artworks individually and in groups (CRV.03)
  • Use concepts and procedures that media arts shares with other arts when creating works of media art (CRV.04)
  • Evaluate the aesthetic components of their own and others’ works of media art or productions, demonstrating an understanding of the process of critical analysis (ANV.01)
  • Analyse the impact of media artworks and productions on themselves and their communities (ANV.02)
  • Analyse the function of media art in society (ANV.03)
TASK
Create a media artwork that constitutes a new “reality”.

You will conceive, create and reflect on a new “constructed” reality by using the principles and techniques of collage and montage.

THEME
How can respect bring peace?

STEPS

A. PRE-PRODUCTION

(i.e., brainstorming, research, completion and submission of proposal);

Read this:
In order for you to do this project you must be an artist. You are to express yourself through your artwork. In order to express yourself, you need to have something to express! Therefore, you need to research the topic - How can respect bring peace?

As you research, keep track of thoughts and ideas that might work for your project.

Do this:
1. Research, learn and struggle with the ideas.
2. Create a new Blog Post called Digital Artist's Canvas Proposal.
3. Read, copy and paste this sentence into your blog.
"I am aware that I will be evaluated on the final product and on my successful presentation of my concept or theme. I am aware that Peter must approve this project idea before I continue."

4. Complete, or answer, the following in the proposal:
Here is what I learned during my research:

Here are three ideas/topics that I have thought of:

The idea I have chosen to pursue is:

Wednesday, September 19, 2007

9. Preparing for the Digital Artist's Canvas

GETTING ORGANIZED

1. Blog Ready?
Be sure that your blog is up to date and as perfect as you'd like it to be. Do all the Student Links work?

2. How can RESPECT bring PEACE?
Start thinking about what this means to you. An artist thinks deeply about the question and dreams up images to express feelings and ideas.

3. Start Gathering Images
- newspapers, magazines
- websites
- original photographs

4. Practise Your Skills
Take more time, if you need, to practise your skills as you let the ideas about the project bubble inside.

Monday, September 17, 2007

8. Collages with Layer Masks in Photoshop

Create your collages using Layer Masks.

It is much more efficient!

Check out this video tutorial called Creating Multi-Photo Collages with Layers.

TASK:

  1. Create your own collage using Layer Masks.
  2. Use at least three source images.
  3. Save it as a .psd as "Yourname Mask.psd"
  4. Save it as a .jpg as "Yourname Mask.jpg"
  5. Create a new Post in your blog called - Collages with Layer Masks.
  6. Upload your "Yourname Mask.jpg" file.
  7. Write about what you learned. What was new? What was difficult? What was easy? How might you be able to use this skill?

Friday, September 14, 2007

7. Performance Task - What is Real?


TASK:
You will create a new picture out of three files. Your goal is to make it look exactly like the one in this Post.

INSTRUCTIONS:
1. Navigate to the ASM3O folder in the Classes drive on My Computer.

2. In the Outbox you will see a folder called What is Real - Performance Task.

3. Use the three files to create this picture.
- Pay attention to all the details so that you can replicate it.

4. When you are finished, save it to your directory as a .jpg.

5. Create a new Post in your Blog called What is Real - Performance Task.

6. Upload your picture to the Post.

ASSESSMENT:
You will be assessed on the following skills:
- making clean selections
- resizing
- moving layers back and forward
- file management (do you AIM IT and NAME IT?)
- following the instructions

NOTE:
If you wish to improve upon the picture I provided, do so - but make a note of the changes in your Comment.

Thursday, September 13, 2007

6. Post & Reflect On your UnReal Animal

It's time to post your creation!

By the time you are done this activity, you will have your UnReal Animal and Reflection in TWO places:
1. on your own blog with the title "YourName UnReal Animal"
2. in your My Documents --> ASM3O --> Unit One --> UnReal Animal with the SAME filename - "YourName UnReal Animal"

STEPS
1. Finish your picture in PhotoShop (.psd)
2. Save it as a .jpg with the correct filename to the right directory. (NAME IT and AIM IT)
3. Log in to your Blogger account.
4. Create a New Post.
5. Title it "YourName UnReal Animal"
6. Upload your picture.
7. Write a reflective response. Include many of these words or ideas:
- difficult
- easy
- clone
- lasso
- I like my picture because...
- I wish I could...

Monday, September 10, 2007

5. Genetic Engineering Gone Awry (Intro)

TODAY'S PLAN

A. Examine the blog to ensure we understand all the blog's elements and features. (We will use the SmartBoard to make it explicit.)

B. Genetic Engineering Gone Awry

TASK:
Create a new picture using Photoshop of an animal that doesn't exist.

LESSON:
Keep notes as I demonstrate the STEPS.

STEPS:
1. Create a folder called Genetic Engineering Gone Awry.
2. Create a folder inside that called Source Images.
3. Choose and download some number of source images.
4. Create a New Photoshop file - dimensions 8 X 10 (horizontally or vertically).
5. Open one of your source files and select the picture element. Copy and paste it into your New PhotoShop file.
6. Save your file now. Call it "YourName UnReal Animal".
7. Do Step 5 with the other source files.

HINTS:
Save your work frequently.
Revisit the Cool Merged Pictures as necessary - just to see them for ideas.

Friday, September 7, 2007

4. What is Real? (Implications)

Today you will see some other samples of special effects from video clips on YouTube. (I typed in the words 'special effects' as a search query.)

We will discuss the societal implications of altering what we see.

TASK
Describe the number of unreal images you see each day. Give examples.
What might be the effects of constantly being presented with tampered images and sounds?

Write your response as a comment to this post.

Thursday, September 6, 2007

3. What is Real? (Still Images)

Here is a gallery of UnReal Images. I will demonstrate and discuss these with you.

Here is a gallery of Cool Merged Images.

Notice that the
better images have:
-
seamless edges
-
consistent proportion (all the picture elements have been resized to make sense sizewise)
- matching
colour and lighting

Here are some links to other art. I will demonstrate and discuss these with you.
M.C. Escher
Worth1000

TASK:

1. Take some time to explore these websites. Keep in mind HOW an artist makes the images

2. Describe what you learned today (tips, techniques, concepts, principles).
Write a Comment to this Post.

Wednesday, September 5, 2007

2. What is Real? (View and Respond)

View the following clip as many times as you like.

Write a
Comment to this Post using the following prompts:
- Describe the visual effects in your own words.
- Describe anything you don't understand.
- Describe how this might inspire you to create your own special effects.

HINT: You may want to write the
comment in Word and then copy and paste it into a Comment to this Post.

1. What is Real?

Here is a video for us to discuss as a class. The video that you will see is not real. As you watch it, consider HOW the film maker made it look real.