LET'S DO IT!!
These instructions assume that you have:
- uploaded your image(s) to Google's Picasa
- uploaded your movie to Google Video
- written your text
- have your links ready
DO THIS!
1. Copy these two files from the ASM3O Outbox to your UNIT TWO directory.
- PAGE - KML Code (Word document)
- Untitled Placemark (kmz file)
2. Double click the Untitled Placemark .kmz file.
Google Earth should open.
3. Replace the APPROPRIATE code with your own information.
4. Copy the EMBEDDED HTML where appropriate.
5. Use Trial-and-Error to see how it's going.
Tuesday, October 23, 2007
Tuesday, October 16, 2007
4. PAGE - Researching and Gathering
Your 'driving question' guides your research.
Write it down. Memorize it. Quiz each other on it. Know it.
The 'driving question' is what you are finding answers for as you research.
DO THIS!
1. Research and Gather
- Search.
- Collect pictures (remember the sources).
- Write notes.
- Organize these in your Unit Two 'directory'.
2. Create a Reflection post called "PAGE - Research & Gather Reflection"
- Write a summary of your accomplishments, ahas, troubles, thoughts and other musings!
Monday, October 15, 2007
3. PAGE - Coming to your DRIVING QUESTION
PAGE = Peace through Art with Google Earth
BLOOM'S REVISED TAXONOMY
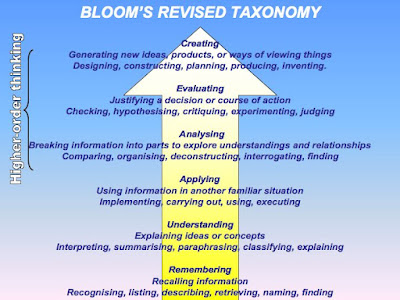
Peter will explain Bloom's Revised Taxonomy to you. It is basically a way to think about learning. Teachers normally talk about it - but, it is valuable to you as a way to understand learning.
DRIVING QUESTION
You must develop a 'driving question' to guide your research and creation.
What is a 'driving question'?
It is a question - a 'fat' question - a 'big' question. It is 'higher order' rather than 'lower order'.
Lower level questions are those at the remembering, understanding and lower level application levels of the taxonomy.
Examples:
How many...?
What is...?
Who was it that...?
Can I name ...?
Higher level questions are those requiring complex application, analysis, evaluation or creation skills.
Examples:
How is...similar to...?
Can I distinguish between...?
Why is ....of value?
Can I create new and unusual uses for...?
DO THIS! :)
1. Create a New Post called "PAGE - My Driving Question"
2. Write all your thoughts in here as you struggle with coming to your 'driving question'.
3. Finish the Post by writing your 'driving question'. Copy this:
My 'driving question' is...
BLOOM'S REVISED TAXONOMY
Peter will explain Bloom's Revised Taxonomy to you. It is basically a way to think about learning. Teachers normally talk about it - but, it is valuable to you as a way to understand learning.

DRIVING QUESTION
You must develop a 'driving question' to guide your research and creation.
What is a 'driving question'?
It is a question - a 'fat' question - a 'big' question. It is 'higher order' rather than 'lower order'.
Lower level questions are those at the remembering, understanding and lower level application levels of the taxonomy.
Examples:
How many...?
What is...?
Who was it that...?
Can I name ...?
Higher level questions are those requiring complex application, analysis, evaluation or creation skills.
Examples:
How is...similar to...?
Can I distinguish between...?
Why is ....of value?
Can I create new and unusual uses for...?
DO THIS! :)
1. Create a New Post called "PAGE - My Driving Question"
2. Write all your thoughts in here as you struggle with coming to your 'driving question'.
3. Finish the Post by writing your 'driving question'. Copy this:
My 'driving question' is...
Wednesday, October 10, 2007
2. GOOGLE EARTH (GE) - Navigation, Placemarks, Ruler
NAVIGATION CONTROLS
1. Learn different ways to navigate effectively in Google Earth. Complete this tutorial.
PLACEMARKS & RULER
1. Add placemarks for your home and the school.
2. Use the ruler to create a line and determine how many kilometres it is from your home to school.
3. Email the image to me at pskillen@ymcaacademy.org
NOTE:
- Include in the email the distance in kilometres.
Tuesday, October 9, 2007
1. GOOGLE EARTH - International Peace through Media
 The YMCA embarks on Peace Week beginning on November 17th - The Power of Peace - the Power of People.
Today, we are embarking on a new media adventure using Google Earth! This media adventure will celebrate peace art and artists from around the world - including your own art from the Digital Artists' Canvas project.
GOOGLE EARTH INTRODUCTION
Today, we will begin to explore and learn how to use Google Earth. We shall start out simply but will learn to create our own 'tours' with placeholders, pictures, text, and video. We will learn to make and share our own .kml and .kmz files.
1. Overview - Peter will demonstrate some samples of media-rich Google Earth tours.
2. Learn the Basics -
 1. Search panel - Use this to find places and directions and manage search results. Google Earth EC may display additonal tabs here.
2. Overview map - Use this for an additional perspective of the Earth.
3. Hide/Show sidebar - Click this to conceal or the display the side bar (Search, Places and Layers panels).
4. Placemark - Click this to add a placemark for a location.
5. Polygon - Click this to add a polygon.
6. Path - Click this to add a path (line or lines).
7. Image Overlay - Click this to add an image overlay on the Earth.
8. Measure - Click this to measure a distance or area size.
9. Email - Click this to email a view or image.
10. Print - Click this to print the current view of the Earth.
11. Show in Google Maps - Click this to show the current view in Google Maps in your web browser
12. Navigation controls - Use these to tilt, zoom and move around your viewpoint (see below).
13. Layers panel - Use this to display points of interest.
14. Places panel - Use this to locate, save, organize and revisit placemarks.
15. 3D Viewer - View the globe and its terrain in this window.
16. Status bar - View coordinate, elevation and imagery streaming status here.
(Picture and notes courtesy of Google Earth User Guide)
DO THIS
1. View an image of your home, school or any place on Earth.
Click Fly To...
Enter the location in the input box and click the Search button.
Google Earth flies you to this location.
2. Go on a tour of the world. In the Places panel, check the Sightseeing folder and click the Play Tour button.
3. Explore - Explore intentionally. (What does this mean?)
16. Digital Artist's Canvas - Finishing Up!
AWESOME!!
We need high resolution .jpg images to print.
DO THIS
1. Open your final .psd file in Photoshop.
2. Save As - and save a high resolution .jpg to your directory.
3. Make a new directory called UNIT 5 (Portfolio).
4. Put a copy of that .jpg in the UNIT 5 (Portfolio) directory.
Be sure that the filenames are correct!
Tuesday, October 2, 2007
15. Digital Artist's Canvas - PRESENTATION
CELEBRATION TIME!!
Present your work to the class!
Use your Reflection notes to help you to prepare your presentation. ENJOY IT! :)
Include the following:
- show your source images
- explain the steps you took
- describe any techniques you used
- explain the difficulties you encountered and how you overcame them
- explain what you would do differently next time

14. Digital Artist's Canvas - TITLE, COMMENT, REVIEW
TITLE
Edit your last post and give your artwork a title.
COMMENT
Comment substantively on the the work of three other students.
Here's How
Copy and paste the following into a Comment for each of three students.
I like your art because...
Your art makes me feel...
I don't understand...
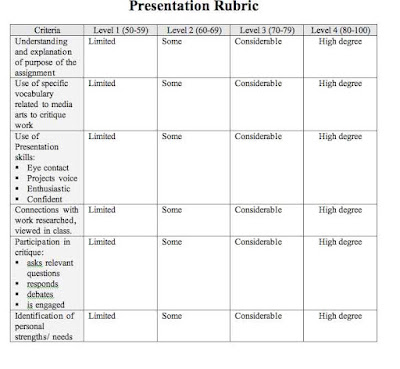
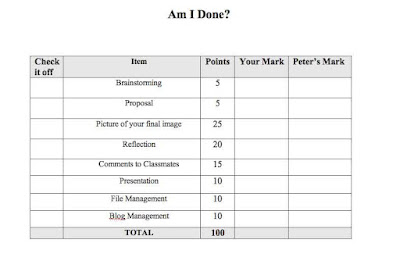
REVIEW
Read this chart and make sure you have done everything satisfactorily.
Edit your last post and give your artwork a title.
COMMENT
Comment substantively on the the work of three other students.
Here's How
Copy and paste the following into a Comment for each of three students.
I like your art because...
Your art makes me feel...
I don't understand...
REVIEW
Read this chart and make sure you have done everything satisfactorily.

Monday, October 1, 2007
13. Digital Artist's Canvas - Post & Reflect
POST
1. Create a new Post called "YourName's Final DAC"
2. Upload your final .jpg.
REFLECTION
3. Copy and paste the following questions into your own blog. Answer them.
a) What changes did you make to the original images you used?
b) What pleases you most about the technical quality of your work? Why?
c) What displeases you most about the technical quality of your work? Why?
d) What new techniques or skills did you learn through the completion of this activity?
e) What message did you hope to convey in your collage, if any?
f) What emotional response do you hope to elicit from your audience?
g) What changes would you make to improve on this image?
Subscribe to:
Comments (Atom)
